Customising & Styling my Jekyll Blog
After setting up my own blog with Jekyll and GithubPages, it's time to customise the standard Minima blog template. This posts shows my local development blog setup, and how you can use it to customise your own Jekyll blog.I recently decided to start a blog - and host it on GithubPages using Jekyll (if you want to learn more about GithubPages and Jekyll, as well I why I decided to use it for blogging, check out the first part of this series here).
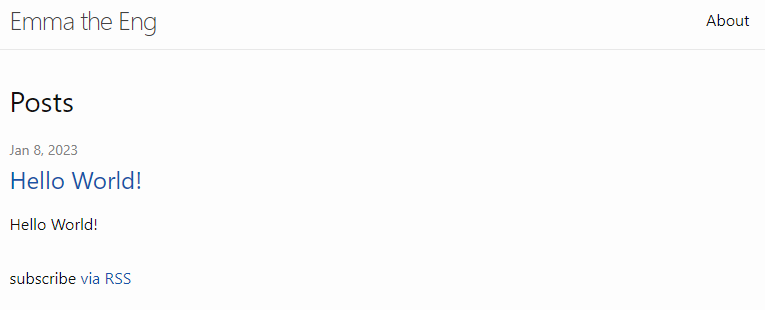
I started my blog using the Jekyll template minima. The reason for that come back to simplicity: minima is one of the themes that’s supported by GithubPages out of the box, it’s very simple to understand and it’s easy to customise. Using minima however also meant that my blog initially looked very… basic. Here’s what the first version of this blog looked like:

First style of this blog using bare minima. Guess you can see what I mean by it looking basic.
Moving forward, I had two options:
- Use another Jekyll template: There’s a lot of very cool, free Jekyll templates out there - you can check out templates and showcases here. Note that you can use Jekyll templates even if they are not out-of-the-box supported by GithubPages using the
remote_themeconfiguration option as described here. - Customise minima: Instead of switching to a pre-made Jekyll theme, I could stay with minima and piece by piece customise it, ultimately making it my own.
I decided to go with option number 2 (because why take the easy road when there’s a difficult one with loads of learnings on the way too, right?). Read on if you want to learn about how I learned to work with minima, and how you can do too!
Local Development Setup
To be able to efficiently develop my own Jekyll blog, I decided to set up the fully fleshed out local development environment. This included installing Ruby, Bundler, Jekyll and Co on my machine. You can find the full official instructions for everything you need to install on the official Github documentation.
I’m using VS Code as my editor of choice for making changes to the blog source code.
Minima
Finally, as I’m starting from the existing minima theme, it’s very helpful to have a local version of the minima source code. As minima is hosted by GithubPages, you need to check the GithubPages depencency versions to understand which minima version to install.

Version of minima used by GithubPages - in my case it’s v2.5.1
To setup the local code for the template of your choice:
- Check the template version used by GithubPages here. For my case, the used minima version is
v2.5.1. - Find the Github repository hosting the theme together with the used commit. For minima, the code is in this repo and the
v2.5.1release tag is here. - Check out the code to your local machine! You can check out specific git repository tags via
git clone --branch <tag_name> <repo_url>, so in my case I had to executegit clone --branch v2.5.1 https://github.com/jekyll/minima.git
I recommend checking out the original template source code in the same parent folder as your own blog source code - that makes it easier to open both of them at the same time in VS Code.
Customising Minima
If you followed the setup steps above, you should now roughly have the following folder structure:
blog_development_parent/
├─ my_blog/
│  ├─ _includes/
│  ├─ _layouts/
│  ├─ _posts/
│  ├─ about.html
│  └─ _config.yml
└─ minima/
   ├─ _includes/
   ├─ _layouts/
   ├─ _posts/
   └─ _config.yml
You should be able to locally compile and view your blog code by executing bundle exec jekyll serve --watch in <your_blog> directory, and then opening localhost:4000 in a web browser.
Example 1: Changing the background colour
To customise the standard minima template we’re now going to piece by piece change and overwrite parts of the original minima code.
One of the first things I wanted to change for my blog was the look and feel. I get that a simple, black and white colour scheme gives a blog a clean feel, but it’s also quite boring. So, as first example, we’re going to change the background colour of your blog.
In minima, the background colour is set in the minima.scss file under minima/_sass/minima.scss. To adjust it, you need to do the following:
- Copy the original
minima.scssfile to your blog source code, under the equivalent directory. When compiling your blog source code, Jekyll is now going to use thisminima.scssfile rather than the one coming from the minima source code.
Your blog folders should now look similar to this:
|─ my_blog/
   ├─ _includes/
   ├─ _layouts/
   ├─ _posts/
   ├─ _sass/
   |  └─ minima.scss
   └─ _config.yml
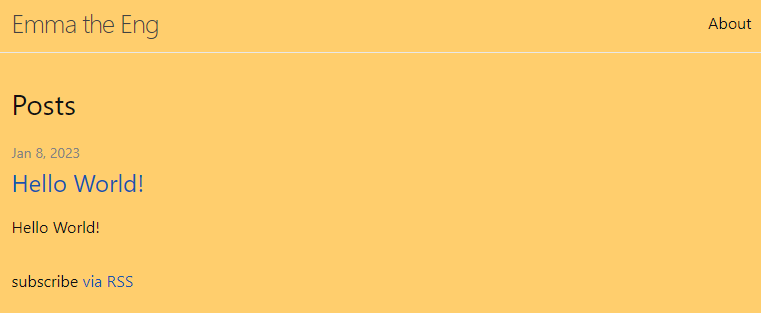
minima.scssdefines a property called$background-color. In your blog directory’sminima.scssfile, change the value of$background-colorto whatever colour you prefer. In my case, I decided to pick a soft yellow. In yourminima.scssfile, you should now have a line saying (depending on the colour you picked, the value will be different):$background-color: #ffce6d !default;- Run
bundle exec jekyll serve --watchto compile and serve your blog code, and open the blog in your web browser. You should now be able to see that the background colour of your blog has changed!

This is what my blog looks like after changing the background colour to a soft yellow!
Example 2: Showing post author in recent post list
In this second example, we’re going to add the author of each blog post to the previews shown on the blog index page.
Here’s what the blog index page looks like initially:

Initial blog index page setup.
You can see that the post preview has the post date on top of the blog post title, but there’s no author!
To change this, we first need to understand how the blog preview list is implemented in minima. The file determining the code for the index site is index.md, which in minima looks like this:
---
layout: home
---
You can see that it uses the home layout and doesn’t define any additional content.
The home layout is defined in minima in the _layouts/home.html file, which looks like this:
---
layout: default
---

<div class="home">
  {%- if page.title -%}
    <h1 class="page-heading">{{ page.title }}</h1>
  {%- endif -%}

  {{ content }}

  {%- if site.posts.size > 0 -%}
    <h2 class="post-list-heading">{{ page.list_title | default: "Posts" }}</h2>
    <ul class="post-list">
      {%- for post in site.posts -%}
      <li>
        {%- assign date_format = site.minima.date_format | default: "%b %-d, %Y" -%}
        <span class="post-meta">{{ post.date | date: date_format }}</span>
        <h3>
          <a class="post-link" href="{{ post.url | relative_url }}">
            {{ post.title | escape }}
          </a>
        </h3>
        {%- if site.show_excerpts -%}
          {{ post.excerpt }}
        {%- endif -%}
      </li>
      {%- endfor -%}
    </ul>

    <p class="rss-subscribe">subscribe <a href="{{ "/feed.xml" | relative_url }}">via RSS</a></p>
  {%- endif -%}

</div>
The relevant bits here are:
<ul class="post-list">: This is the html list containing one<li>item for each blog post in your blog{%- for post in site.posts -%}: This is the Liquid syntax for an iterator iterating through all posts available on your blog website. In between this and the matching{%- endfor -%}, the data for each blog post can be accessed via thepostvariable<span class="post-meta">: This is the html tag containing the date of the post. We want to add the post author right next to the date.post.date: This is how the date of the post is accessed. The post author can be accessed similarly viapost.author.
To add the author to this layout, we again will need to create a version of the home.html layout file in your own blog, and then adjust it to include showing the author:
- Copy the original
home.htmlfile to your blog source code, under the equivalent directory. When compiling your blog source code, Jekyll is now going to use thishome.htmlfile rather than the one coming from the minima source code.
Your blog folders should now look similar to this:
|─ my_blog/
   ├─ _includes/
   ├─ _layouts/
   |  └─ home.html
   ├─ _posts/
   ├─ _sass/
   └─ _config.yml
- In your blog’s
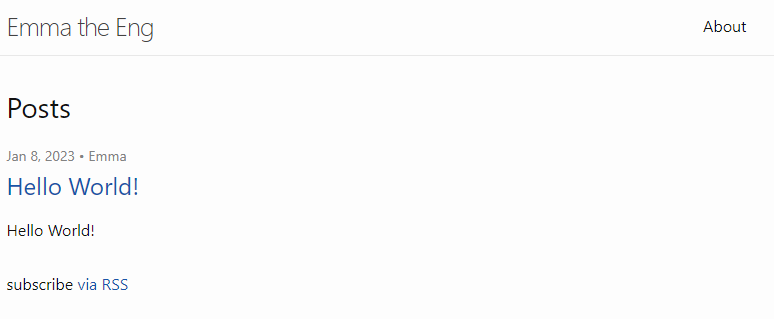
home.html, change the html span showing the post date to also show the author. This should look somewhat like this:<span class="post-meta"> • </span> - Run
bundle exec jekyll serve --watchto compile and serve your blog code, and open the blog in your web browser. You should now be able to see that the blog post previews shows the post author right next to the date!

This is what my blog looks like with the change displaying the blog post author!
Conclusion
In this post I’ve shown you how I set up my local development environment to customise my Jekyll blog, starting from the minima template. We then went over two simple examples, changine the blog style as well as one of the page layouts.
The idea of these changes is quite similar - locate the definition of the property in the original minima code, make a copy of the file into your own blog code and adjust the relevant parts. And guess what - it stays that simple, even for more advanced changes!
I’ll keep adding tutorials to this blog for slightly fancier topics, like adding categories and tags to posts, or helping google find your blog. Let me know in the comments if you have any additional questions, or if theres a specific example you’d like to see! :-)